Showing posts with label Tutorial. Show all posts

Friday, 7 September 2012

Pakaging and gift bags and a little DIY

I've been making my own jewellery bags recently for Chloe And The Chimera for fairs and markets.  They won't ever win a packaging award. They are extremely basic, over complicated for my purposes and not especially well designed! I got the flat card on which they are printed back from my laser printer owning friend, and while looking at them, and honestly, not being too happy with them, I started thinking about all the clever, witty, and breathtaking packaging ideas that there are out there. My own design came about as wanting something I could make myself. Which is why they are so basic. I want something more exciting and eye-catching! I'll be working on this when my current stock of bags run out!

These juice cartons are everything I want in my own packaging some day. Clever, witty and functional.

This amused me sufficiently. Eco, manly, and done well. Not sure what it was meant to house, but I could see mp3 player manufacturers selling them in this (I'm sure its already been done.)
Isn't this cute? Especially for Halloween? Little broom stick gift bags! Such a simple idea, you wouldn't even need to add the cut paper over the top, a marker pen would do the job. This is the kind of way of perceiving things that I am always jealous of.

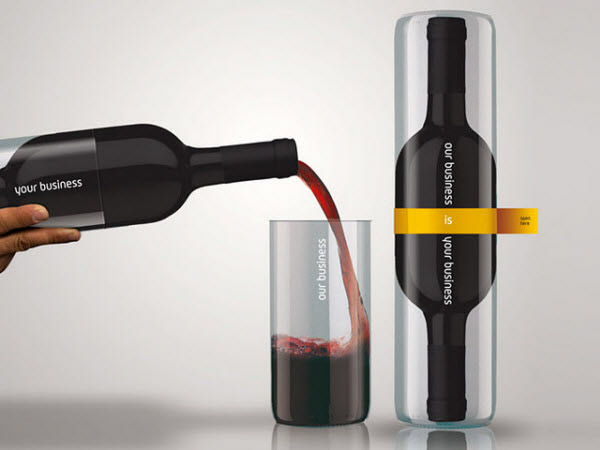
I remember when I was young I was given a toy that was pretty much the same as these wine bottles. There was a blank face and removable stickers so that you could make silly faces again and again. I guess that's why this branding appeal to me. I like the idea of making faces that reflect the character of the wine. Sharp, mellow, sweet etc.

Completely impractical, space wasting, and utterly cute, funny and desirable! I wouldn't choose to make something like this for my own business, but I admire what they have done hugely!

These I decided to include in my picks for no other reason than that they are so striking. I love the illustration, the lettering and the patterned wrapper at the top and the matte black bottles are to die for. Lord knows what's in them!

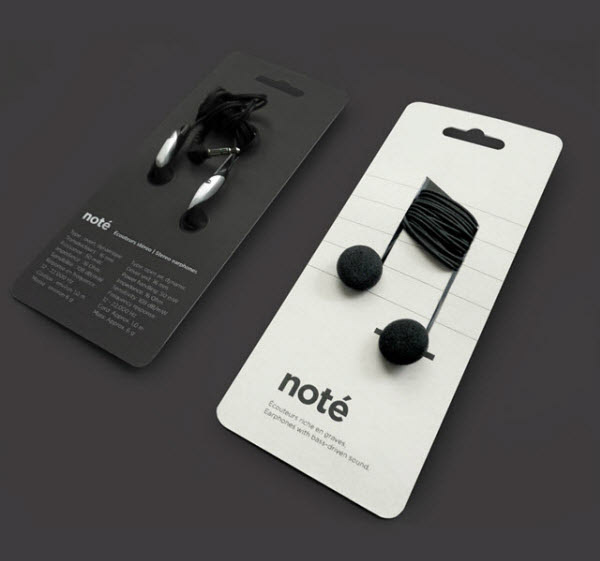
This is again the sort of design I like, clever, useful and with a bit of wit. I wonder if there is a way of utilising my jewellery to make up a part of the packaging as with the nails here.

Hilarious! I want paint brush moustache faces!

I included this not because of the graphic quality, but because I spent about 2 minuets working out which way up the bottle actually was. And then I found this picture of it below! I had seriously doubted that it was real!

 
I think more than one brand has done this, but it is again clever, witty and perfectly designed.

Rather than lift the images, this post says it all about some clever packaging solutions for sending absolutely anything through the post.


While searching for packaging ideas I came across this. Unpackaged is a grocery shop in London. They have done away with packaging. You bring your own boxes and whatnot, there are vats with the smaller things like mixed fruit, pulses and nuts.  In reality this is what we should all be striving towards isn't? I loath the amount of packing I chuck away, whether it's to landfill or recycling. The vast amount of it is totally unnecessary. Maybe I'll make that a selling point eventually for Chloe and the Chimera. Perhaps I'll send my handmade jewellery in scrunched up Asda bags...?


Before that happens, I'd like to show the steps I made developing my current little gift bags.

I was always pretty good at working out nets at school, so I sketched this out of my head, cut it out and made it up.

I drew the ideas for the design on it flat and then made it up again to make sure I had things the right way up!
I scanned it in to the computer. It took me 5 seconds to pull the images and text from another document to put on the bag. It took me an awful lot longer to create the straight lines!

As you can see here I eventually managed it. These are the nets cut out an ready to be made up. I got three of different sizes on to a sheet of A4, I had to adjust the sizes to get them on. I don't like to waste paper.
The three sizes made up! At this point I took a good look at them (ignoring the bad print quality, my printer keeps spewing out splodges of ink all over the place at the moment.) I didn't like the side joint being at the front seam of the bag, and the bottom looked a bit messy too.

I cut it apart (glue was too dry to de-stick.) I used this as the template to produce the new net (below.)
That is what I scanned in to the computer again, cleaned it up and added the graphics again.
Cut and folded in readiness.
 
Glued together.
 
And, folded at the sides to create the bag shape.
Although I don't have a picture of the final bags, they are on card rather than paper, and, printed on a laser copier, the half-toning isn't as good as my regular printer, but it is devoid of splodgy ink everywhere. Once stapled shut with their lovely contents inside I think I'll be reasonably pleased with them.

I'm really looking forward to when they've run out and I can get creative and come up with some really exciting ideas!


All images are © Chloe Cooter 2012 unless image links to another website. All images that are not © Chloe Cooter will be linked to the source (if possible) and credited in that way.

Monday, 9 July 2012

Things to light up your day

Because of our sunny and heatwave like conditions here in Bristol this summer I have decided to share some lighting DIY ideas I've stumbled across recently to help brighten things up a little!

Starting with this cloud look-a-like light, which is just so adorable!

Cloud light DIY

Might need to be a bit canny putting it together though as the instructions lack pictures. There is a LOT of emphasis on using LED or cool/cold lights, so keep that in mind!


Doiliy/lace lamp DIY

This, and variations on this (including using wool) have been doing the rounds for ever. I've given it a try with wool and found (as some people who contacted the original blogger) that the balloon stuck for the wool after being popped. I got around it using cling film which then stuck to the wool (but then I did use varnish not wallpaper paste for outside use!) I left it there because I liked how it looked. I also didn't use this idea with lights, but as a moving sculpture in my garden.


Fairy light chandelier.

This link is not for a DIY page. But I can image with a little chain from B&Q, some twigs/branches from the garden some garden twine/wire, a hoola-hoop and your trusty LED battery powered fairy lights you could have a very serviceable chandelier of your very own!


I searched "branch light" on pinterest!

Take a look your self! There are too many ideas to pick from! The DIY element of these could potentially cause some problems where the lights are on the mains, and where the branches are suspended from the ceilings. For the non-electrician I would suggest more fairy lights, either battery or from a plug. You can get some great ones that have a different effect to what I normally bring to mind as fairy lights, as shown above in the picture (I am seriously lusting after bare light bulb lights on a string!) Strong fishing line would be hefty enough to hold up a branch if secured properly in enough places. And maybe consider affixing it to a wall instead of the ceiling?


Feeling brave? In possession of a drill?

Personally I wouldn't dare. What I have dared to do in the past though was to use an un-drilled wine bottle (I used green and produced a very eerie light!) and fed battery powered LED lights in through the opening in the neck. The reason that the experiment remained an experiment was because I hadn't found a way I liked to hide the battery pack. Although I can come up with a few options you could use including a bunch of flowers, or you could concoct some sort of sturdy stand with a piece of dowel on it so that you could up-end the bottle, leaving the batteries at the bottom - much easier to hide then. Or even something as simple as a lamp shade.


Solar garden lights DIY

The above (text) link seemed by far the most descriptive of all the ones I looked at, but I'm sure there are hundreds out there that cover what needs to be done. I know for sure that Asda, Wilkinson and Poundland sell solar lights cheap, I've also picked up similar, suitable jars in Asda, (but why not try and be creative with it!?)

I think I might give the above a go very soon! I imagine there's going to be quite a few solar lights on sale this year because lets face it we've not had enough warm weather to sit out in have we? *grumble grumble shiver*

Friday, 2 March 2012

Great kick in the right direction

This article on the Guardian website is a great 'What to do now?!' piece.

Alys Fowler: Seedlings 
It's time to get sowing. Photograph: Alamy 

It can be daunting knowing this is one of the most precious, critical times for grow-your-owners – an uneasy feeling can descend as you spend time on one task but ponder if you'd be best doing something different instead. For those of you new to grow your own and learning that from late February/early March onwards, veg gardeners tend to get a bit frenetic, here's a run down of the main tasks to focus on.


Priority one: Plan what you're going to eat, buy and grow


Again you may have already thought about this but if not, make a list of what you eat as a household, what you can realistically grow and what you're happier to buy in. Onions and maincrop potatoes will be on my to buy list as they take up lots of room (my garden is tiny) and they're cheap food. But I've just planted some heritage salad potatoes, sown some 'Cuor di Bue' beefsteak tomatoes and started off six different types of basil. My reason? They all taste amazing when eaten fresh and you can't find them readily in the shops.


Priority two: Buy seeds and order plug plants


Once you've sorted out your list above, work out whether it's best to sow seed (crops like radish, salad leaves and beetroot are robust and really easy) or buy plants (chillies, aubergines and tomatoes need quite a lot of heat and good light – can you give that to them?). Plants can be bought later, freeing up valuable propagating space now. See my previous blogpost here.


Priority three: Get your propagator set up


I've had my heated propagator since I was 15 (I'm twice that age and more now) and it's by far my best gardening investment. If you're sowing indoors then I'd really recommend buying one. I set mine up in January and it will run until April at the very least: getting it fully functional now will mean that seeds can be sown as soon as you buy them. Ones with a thermostatically-controlled heated base are more costly but they're much more versatile, too, as the range of temperatures allows you to sow all manner of seeds. Make sure they're positioned in good light, and check daily for signs of germination.


Priority four: Get your ground ready


Now that things are ticking along in the propagator and plants are ordered, it's time to tend to your outdoor growing space (you don't want to be in the situation where young plants are desperate to get out of their pots and your ground is still smothered in weeds and last year's detritus). Dig, hoe or mulch – whatever is your chosen method to clear the ground. One nifty technique for very weedy patches is to create a "stale seedbed". Rake cleared soil to a fine, crumbly seedbed, cover it with clear plastic (a tunnel cloche is ideal) and then leave for a fortnight. Weed seeds near the surface will germinate – then you can hoe them off so that when you sow your veg, that flush of weeds will be gone (hoe shallowly otherwise you'll just bring new weed seeds to the surface).


Priority five: Tend to your growing on space


After a quick dig, the next focus is your propagation area. Once seedlings emerge they can stay in the propagator for a few days but you really want to get them out of this environment as it's naturally very warm and humid – great for germination but not for stocky, robust leaf growth (you'll end up with sappy, lush growth that's a magnet for pests and diseases). Find somewhere well lit from more than one side - an entrance hall, porch, conservatory, or, for the blessed few, a greenhouse – and warm (16C minimum). Young plants will happily sit here for three or four weeks, until the weather behaves and you can start moving your plants outside (but that's a whole different blogpost).
Related Posts Plugin for WordPress, Blogger...